

 Thank you to everyone for the wonderful comments about my slipcovers. It was very encouraging. I thought I would take some new photos now I have added the new cushions i made today and to show you the room nearly finished with the new curtains...and in better light. Yesterdays photos were terrible and I am sorry.
***Please be aware that this canvas is temporary and is hanging from a hook that was already there so it is too high. It will save time patching when the new work goes up***
 These are the new ones I made from the material I bought in Sydney at Ikea. I am still after a lovely RL inspired blue and white floral to have on the sofas, but this navy one will do in the meantime.
 So here is the living room as it looks today, the 1st day of Spring! I am not settled on the canvas above the sofa and I have my eye out for the perfect (is there such a thing?) statement piece to go here, but I am happy for now. You can see the new white curtains I made for the French doors. I love these. The light coming through them just illuminates the room. If you are wondering what the little black thing is above the doors, it is a bird silhouette.
I hope you like...I am sure it will change!!
Ness xx
These are the new ones I made from the material I bought in Sydney at Ikea. I am still after a lovely RL inspired blue and white floral to have on the sofas, but this navy one will do in the meantime.So here is the living room as it looks today, the 1st day of Spring! I am not settled on the canvas above the sofa and I have my eye out for the perfect (is there such a thing?) statement piece to go here, but I am happy for now. You can see the new white curtains I made for the French doors. I love these. The light coming through them just illuminates the room. If you are wondering what the little black thing is above the doors, it is a bird silhouette.I hope you like...I am sure it will change!!
Ness xx


 Yay...it worked!!! As you know I was attempting to slipcover our beat up sofas. I bit the bullet and done the deed. Yesterday, along with our little Mason turning 3, I covered the seat cushions and back cushions. Then today tackled the rest of the sofa while Mason slept. I thought I would show you how it went down....and all for $68.00!!!
  This is what I started with - a comfortable sofa with age tattered fabric.
 I
I  Once I was happy with that I put some pins along the back of the sofa to hold it in place.
 The same was done along the arms of the sofa. I also drew little guides where the corners are to make it a little easier when the cutting, pinning and sewing began. Then all I done was traced along the edges and grooves of the sofa, matched up the lines and pinned.
 Once I was happy with that, I put the cover back on the sofa to get the hem right, sewed that and here is the base cover finished.
 And here it is with the back and base cushions on. This photo is really brassy looking because I forgot to take one in the daylight, so had to use the flash and Mic was sitting on it, so I didn't get to fix the cushions for the photo...but I hope you get the picture.
 So, after all of that (and a quote of approx $2500.00+ for the two sofas to be covered) it only cost me $68.00 and 5 hours time over 2 days...and I even have enough fabric left to do the other sofa! Now I can have my cup of Coffee in this lovely squishy "new" sofa.
 As we are get into the mood to celebrate ... an outdoor do ... may sound even more inviting ...
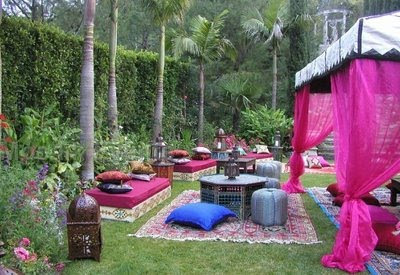


 My day was hectic to say the least. Workout in the morning, back home for a Upholstery quote, then a meeting with the Bride to finalise details for the Spring Wedding I am styling, making new living room curtains...and covering my sofa!!!
 I am still working out details for our bathroom renovation, but the new wall and window has been ordered so I can finally see some light! I would love shutters on the windows like this.
 OK, some of you probably think I am mad for covering our sofa by myself, but we just don't have it in the budget with all of the other major things that is going on here. I am making a fitted slip cover very similar to this one, and it is turning out really well. I will post pics once I am done.
 The colour of these curtains is what I replaced them for.
 This photo is just lovely. Everything here is right up my alley....I have just realised that this post seems like I am trying to mimic this home. I promise I am not, but looking through some old images of saved homes the other day, I realised just how much this home is what I am after.
 While on Holidays recently, the boys and I stayed at my Parents house. This is the home where I was born and raised, where I learnt my love of Antique and worn pieces, markets and thrift shops...and creating a welcoming home. My Mum loves French style like me, but she has always had a love for old country things and teams the two together.
 Mum loves Lavender and where ever she is seems to find some to fill one of her many pots, vases and jugs.
 Another love Mum and I share is Hydrangeas. This bunch is in a big enamel jug and bowl in the bathroom.
 Another bunch in the room one of the boys occupied. Mum has a thing for jug and bowls and often finds the pieces without its pair and will then track down something to match it in a different town!
 This is my Parents bedroom and shows my Mums love of that older English country style. Mum is going through the motions now of re decorating this space into a French boudoir.
 I can't forget my beautiful Dad and his uncanny sense with wood and carpentry. Self taught, he is someone who can walk into a store etc, see a piece of furniture, scoot home to his shed and whip that exact piece up from just the photo in his head!! This clock is one such piece.
 His beautiful fireplace in the living room is something Dad made up as he went. Mum had given him a rough idea of what he wanted and away he went. It is a talking piece and many have wanted one. I was lucky to have one of my Dads fireplaces in the home we built when we lived near by...the couple who bought it wanted the fireplace to be included in the sale (it was an unfixed one) as I had it filled with burning candles on viewing day and she fell in love.
 Another bargain find was this Chandelier which she picked up here in Tassie while visiting us for some ridiculous amount...then Dad made up about 50 little wire rings to string vintage crystal pieces to it.
 I am not sure if this lamp was picked up at a market or thrift store, but I do like it and her birds that were bought for a few dollars. So, you see I was surrounded by loads of creative influences as a child and teen and I am so proud of them for shaping me into the savvy bargain hunting, fabric loving, Interior obsessed Woman I am today...thanks Mum and Dad.


